Project 3: Identity by Numbers
We typically think of identity design as delivering a singular vision: one logo, one design system, and one style guide directing its applications. In this project you will be designing an identity for a speculative client and scenario that you will define. And rather than producing a single logo, you will be designing a system that is driven by parameters, generating a potentially unlimited set of visual marks.
Case Study 1: Conference Badges
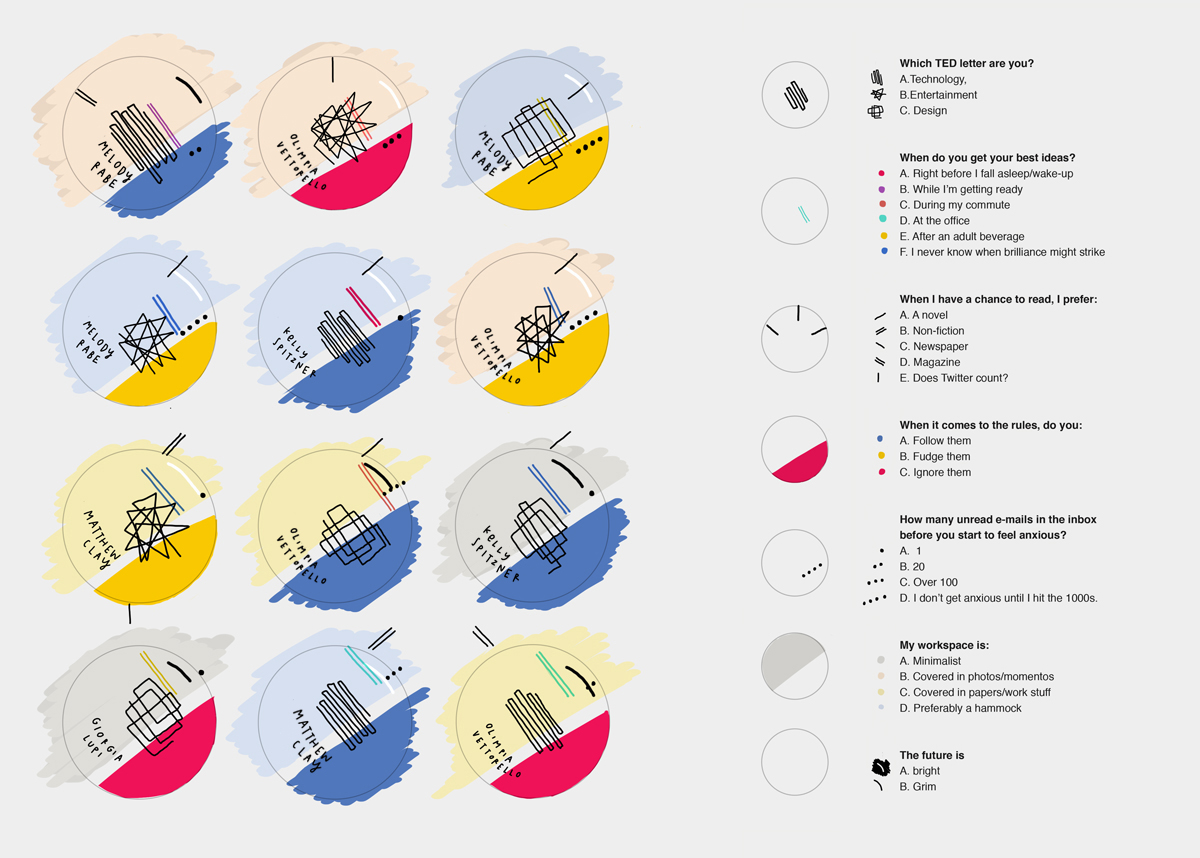
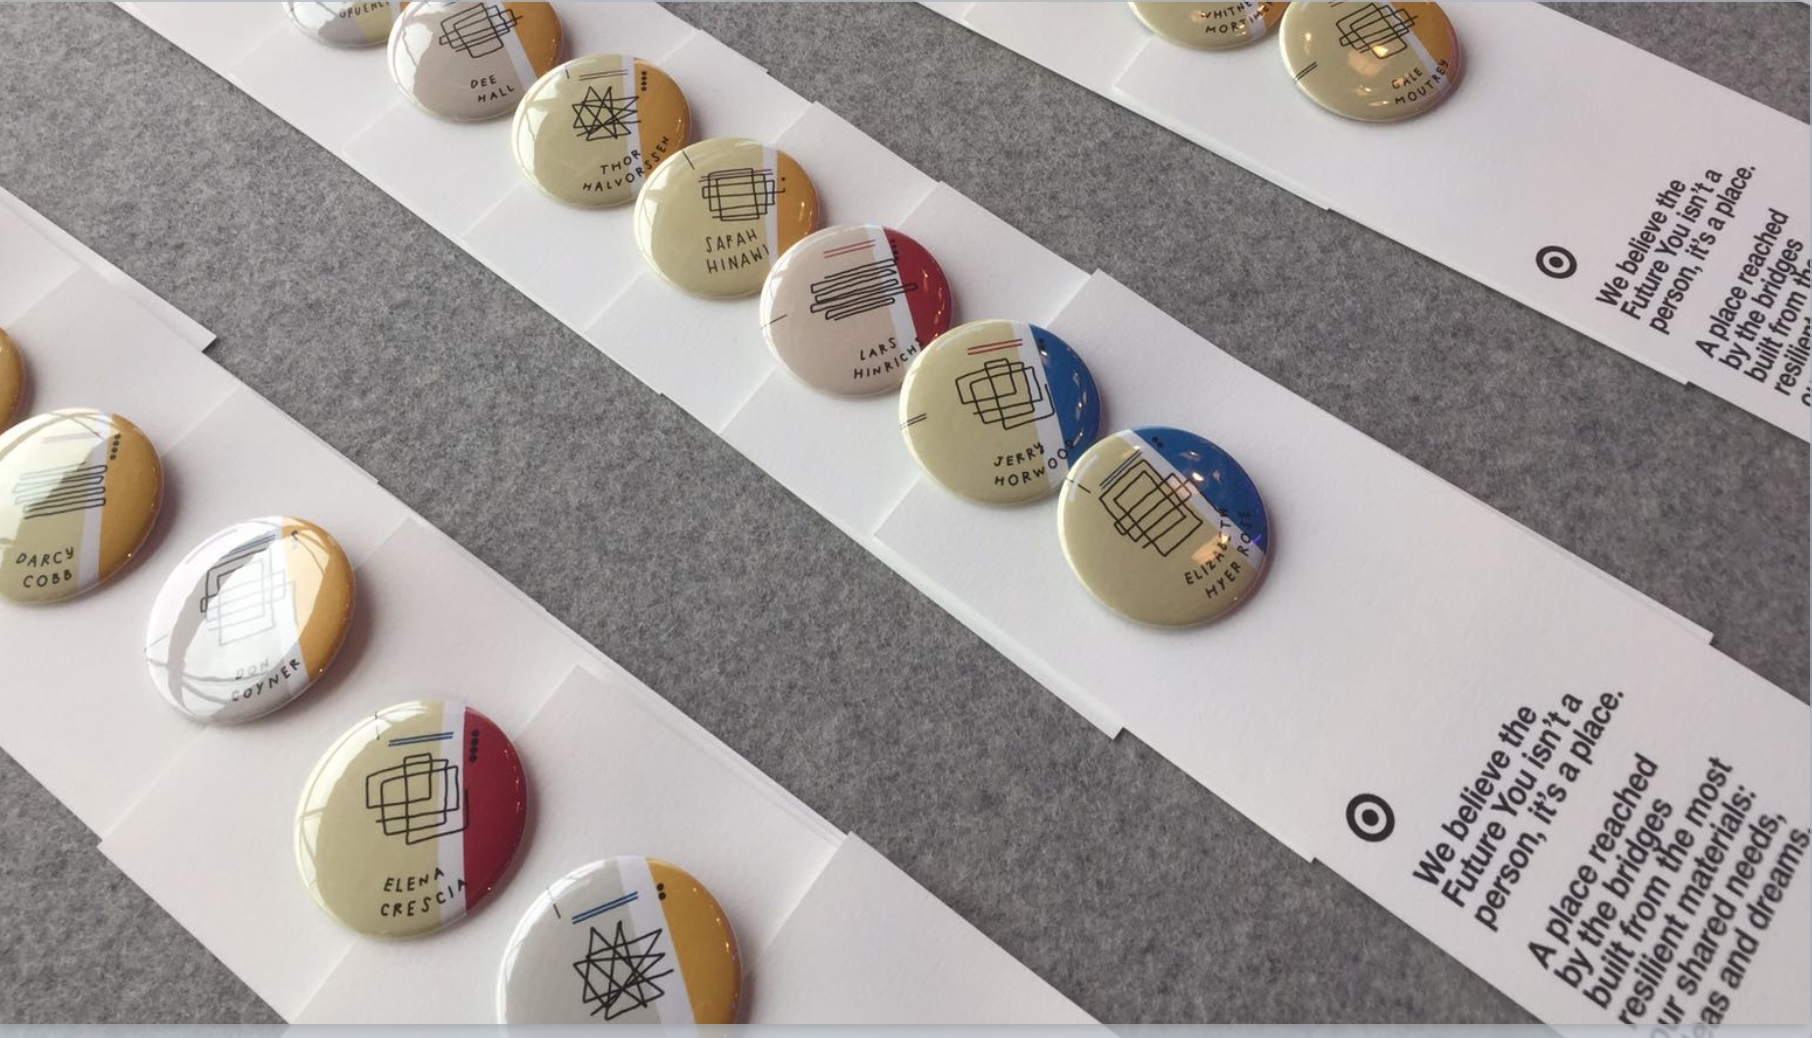
In 2017, data visualization designer Giorgia Lupi created a series of badges for attendees of the TED conference in Vancouver. Each badge was a ‘portrait’ of its wearer in that it was a combination of visual elements that symbolically represented answers that they had given in a quiz taken when they registered.
This approach yields an enormous amount of graphical variety in what could otherwise be badges whose only distinguishing feature is the name of the wearer. In addition to the sheer visual exuberance of the result, the badges also give attendees a pretext to talk to strangers, since they are literally wearing their interests on their lapels for all to see.
Case Study 2: University Departments
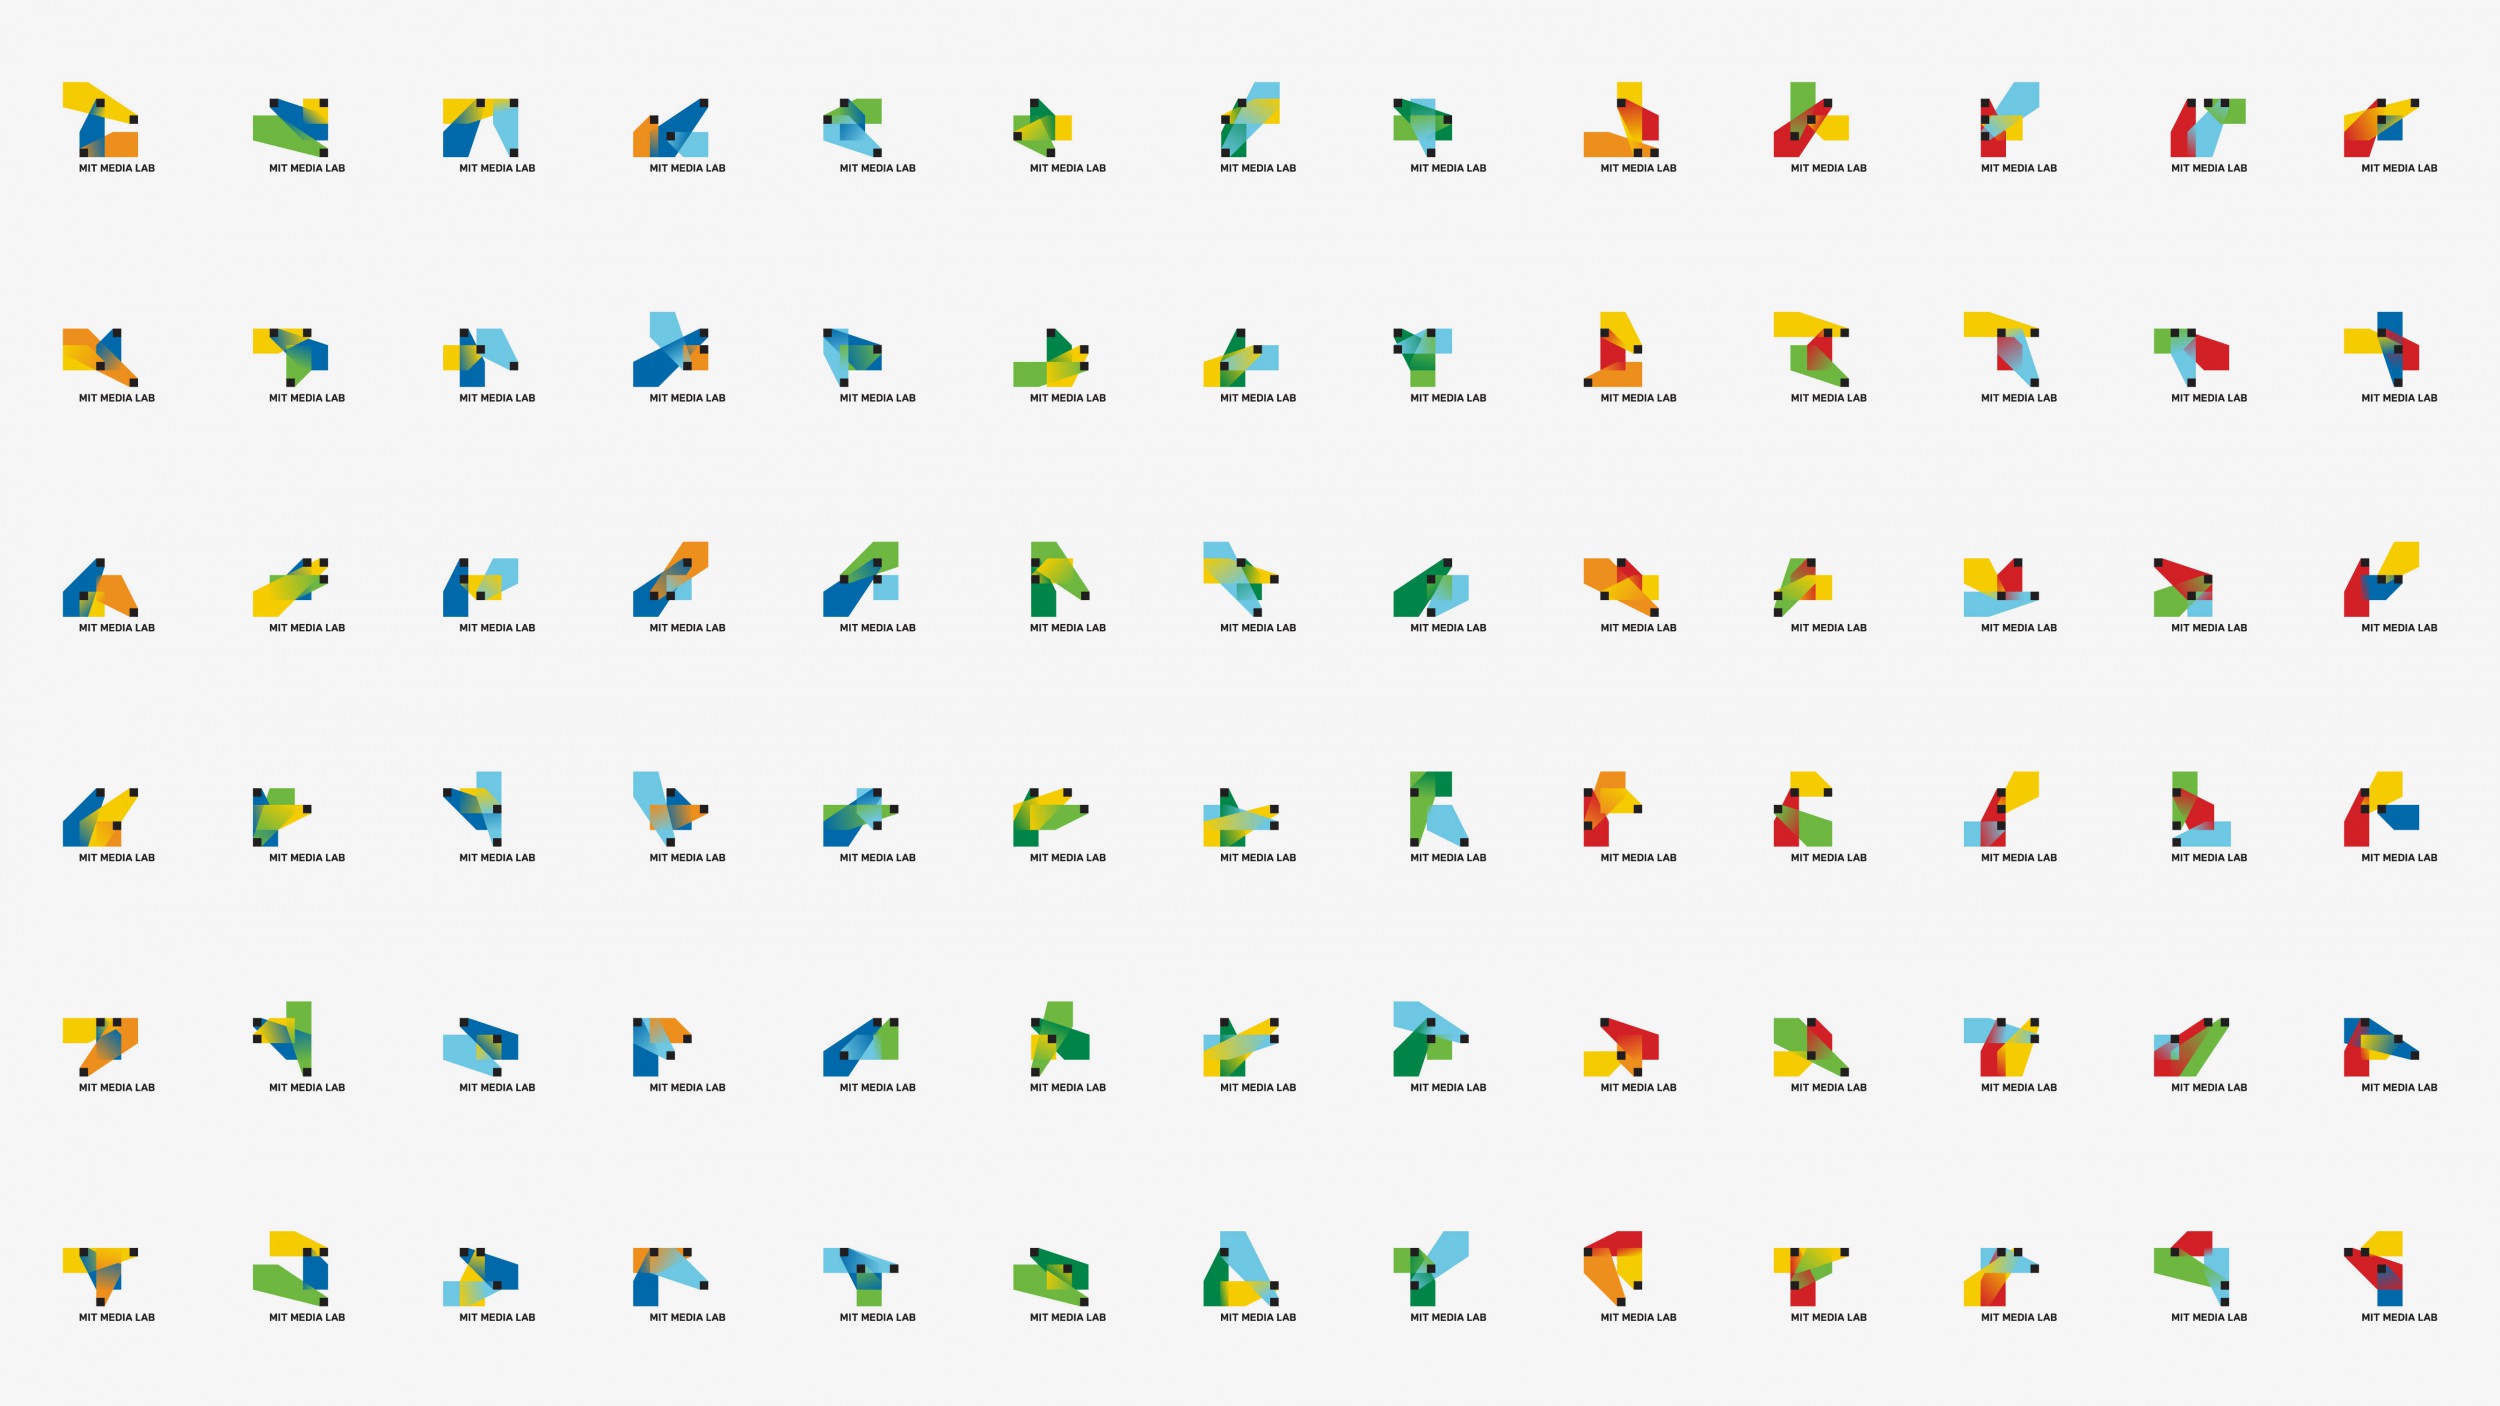
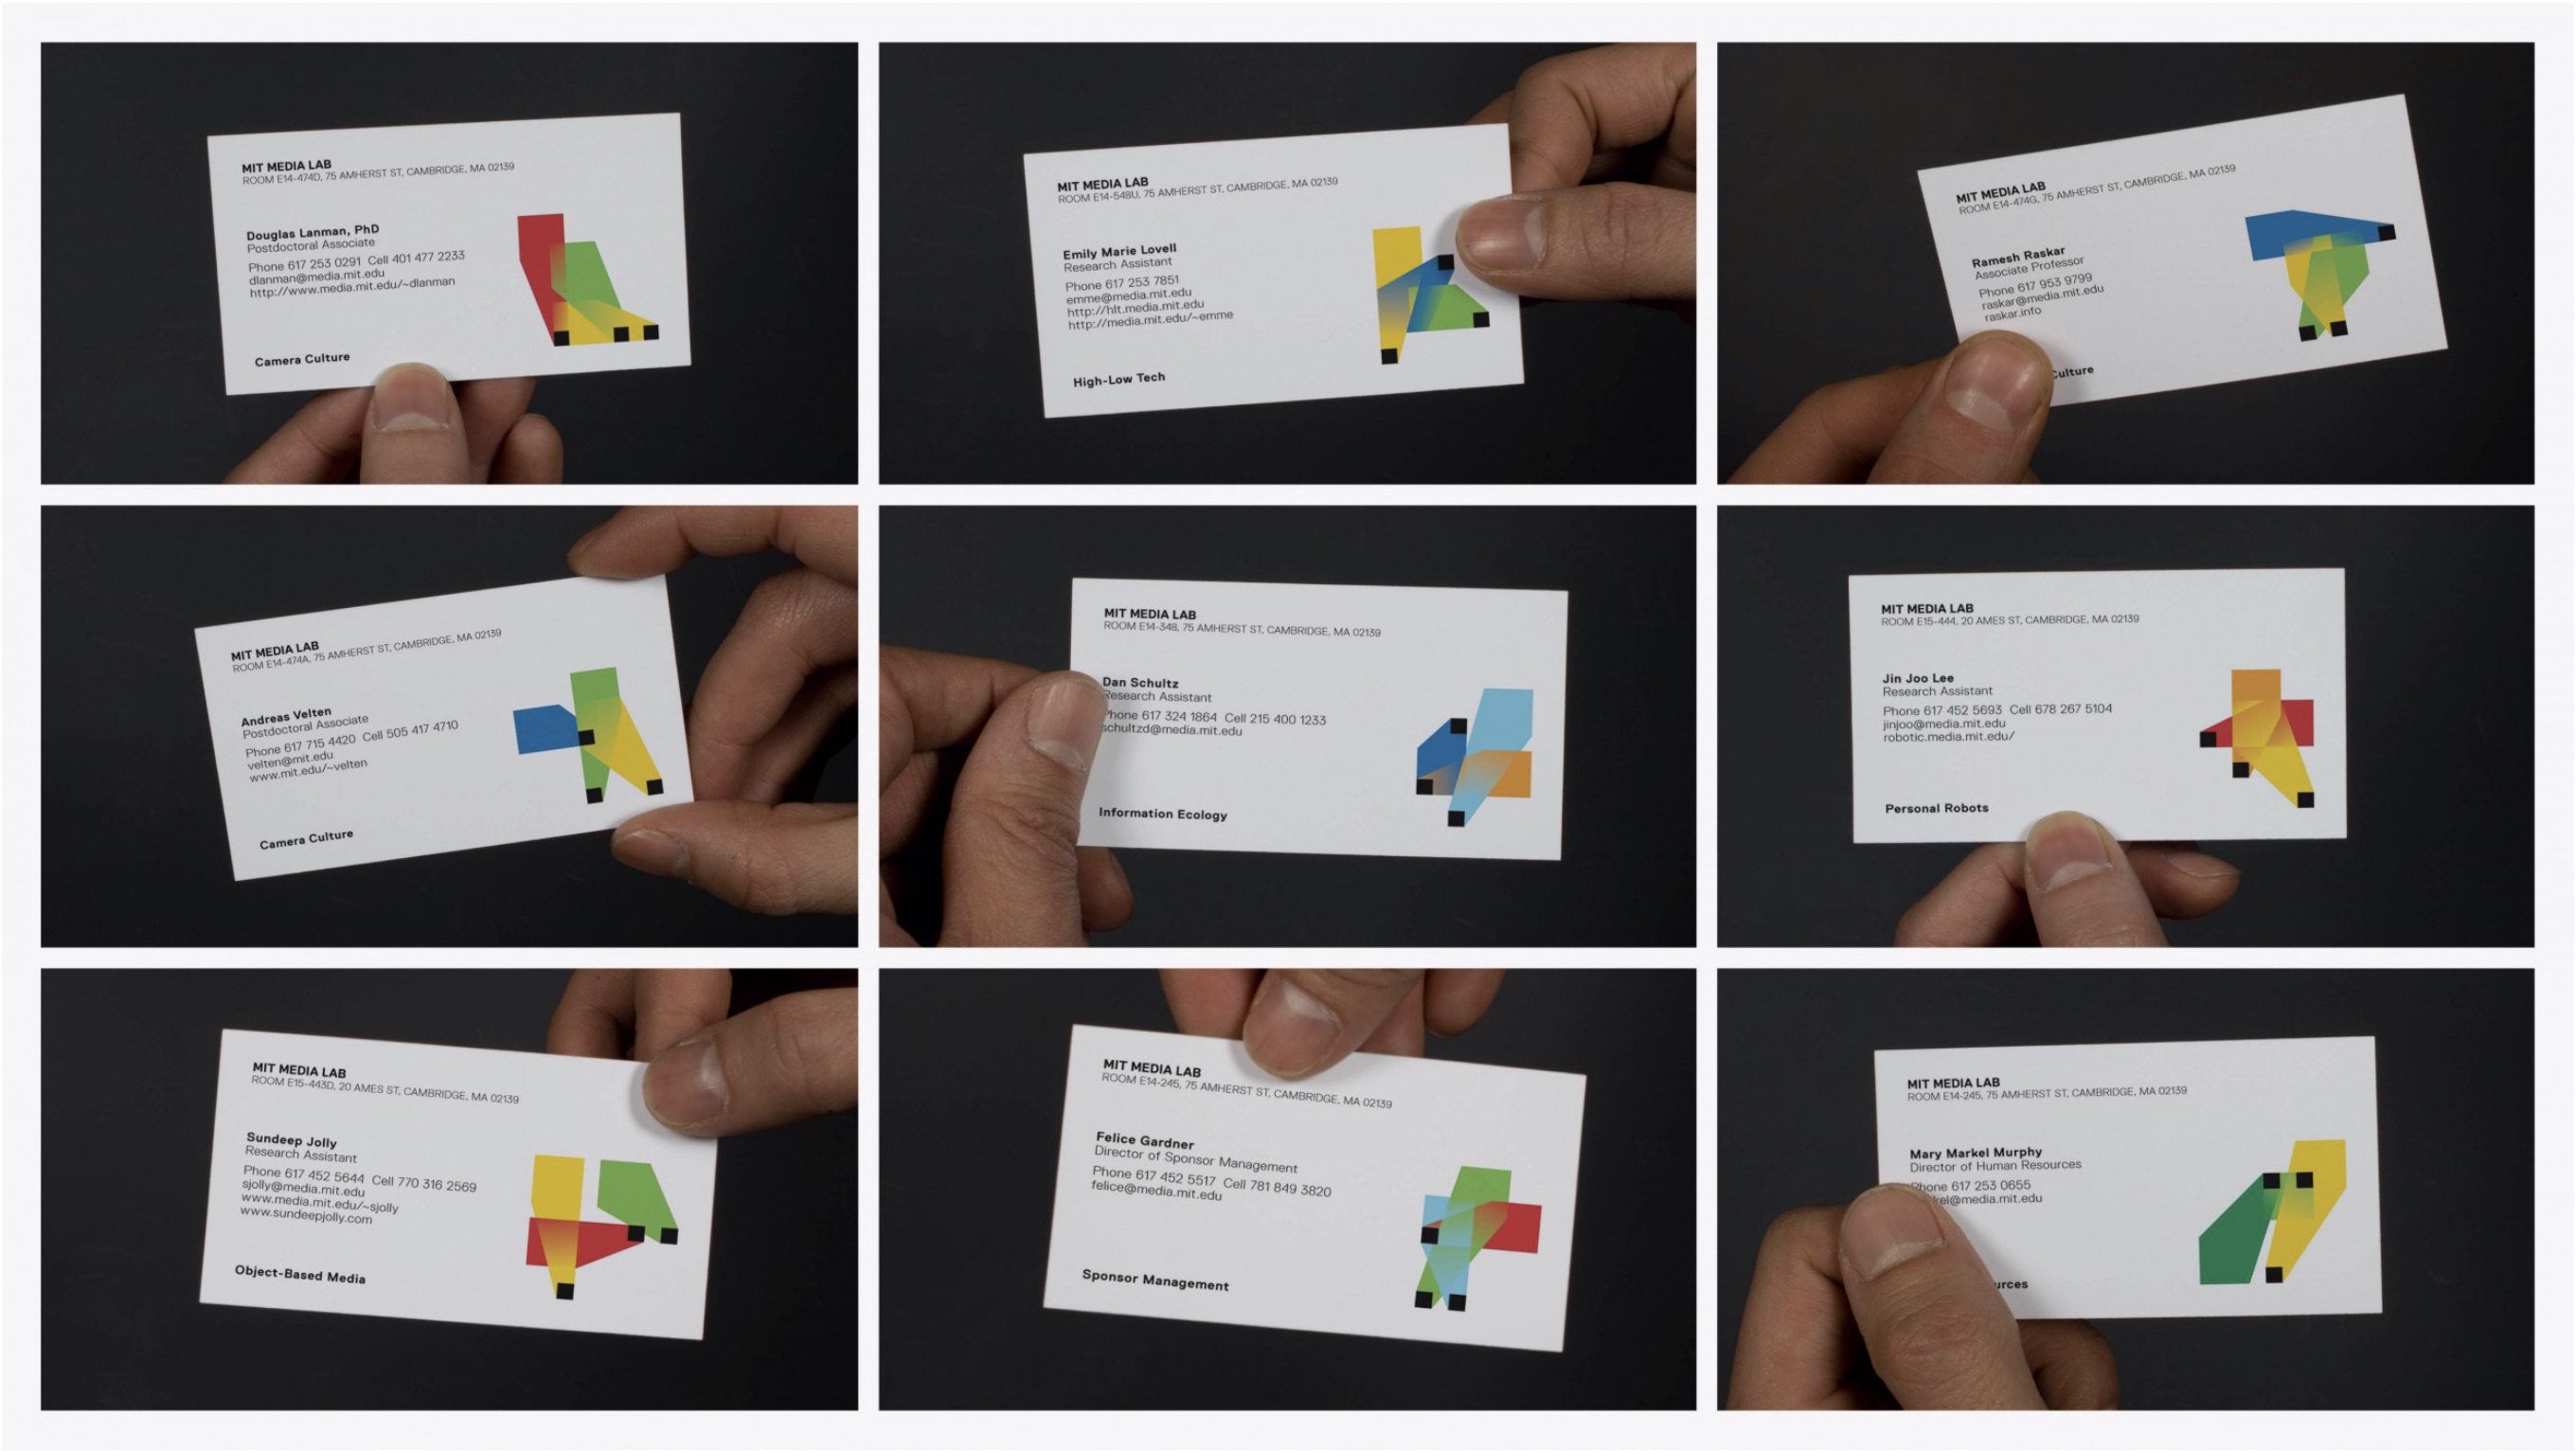
MIT’s Media Lab has a long history of procedurally generated, unique identities for its business cards, brochures, and other collateral. As part of a redesign in 2012, a system was devised to generate a series of related but distinct logos. The colors, positions, and shapes all change from one instance to the next. But the constants in the design (three black boxes, three gradient extrusions) allow you to instantly read any particular example as part of the larger family.
Getting Started
Your first step will be to identify the scenario that your identity system is intended for. Is it for an event? Are you generating logos for groups within a larger organization? For individuals? For animals, places, or objects in a collection? Get as specific as you can in terms of imagining both the application and the ‘client’ (if there is one).
The scenario that you choose should have two qualities:
- It is composed of many distinct entities (whether people, organizations, objects, or places), each with their own qualities that can be used to customize their visual representation.
- All of these entities are linked by their membership in the larger group and as a result there will be a ‘family resemblance’ between all of them.
Some possibilities to consider would be:
- ID cards or badges for an institution or event
- Book covers in a series
- Movie posters at a film festival
- Elements from the periodic table
- Departments within a university
- Corporate divisions within a congolmerate
- Alternative flags for countries or states
Once you have a scenario in mind, determine the attributes of the entities within it that you can use to generate unique combinations of visual elements. If your set is made up of people, think of information you could collect from them in a survey. If it consists of objects, try to figure out what aspects you can objectively measure or subjectively describe.
Each attribute will have an associated range of possible values:
- Freeform text (with a maximum length)
- Multiple choice from a set of options
- A number within a given range
Focus in particular on the things that make the individuals within the set distinct from one another.
Week 1
Choose three possible scenarios for your identity system. For each scenario:
- Write a brief description of the event, group, or collection you’ll be representing
- Identify five attributes that you will use to represent each element of the group graphically.
- Define the range of values that each attribute will cover (i.e., list all the options if it’s multiple choice, the min and max values if it’s a number, etc.)
- Similar to the right column in the first image on this page, create a visual key showing the mapping between all the possible values for each attribute and the way that attribute would be drawn
- Create three examples where you use your five attributes to generate a full identity for individuals whose attributes you have set by hand. Next to each graphic, note the values for the attributes that it is representing.
Document your three identity design systems by next week:
- Due date: 11/5 by 9am
- Format: one PDF with each system on its own page (or pages)
- File name: Please use your first initial and last name (for example:
cswinehart.pdf) - How to submit: Add your file to the identity-systems folder inside our shared GD355 Activities folder in Google Drive
Week 2
Setup
Start working in the P5 Editor by duplicating this template. Note the data/books.csv file that can be revealed by clicking the > button right below the ‘Play’ button.
- Rename the file from
booksto something else that’s more appropriate for your chosen scenario - Make sure the new name still ends in
.csv - Update the code in
sketch.jsto use the new filename
Process
Select one of your scenarios and make two lists:
- Expand your list of attributes from the initial five up to a total of ten parameters. For each, identify its range in terms of numerical min & max, multiple choice options, or text length (whether in terms of character count, word count, width at a particular font size, number of lines, etc.)
- Come up with five possible applications for the identity system you’re designing. Decide on both the form it will take (ID card, user avatar, vehicle markings, cash register screen), and the purpose it plays in your scenario (is it about identifying visitors at an event? Communicating orders to cooks at a restaurant? Differentiating each delivery truck within a fleet of thousands?). Approach your scenario on its own terms and think of the various contexts in which a visual identity system could be useful for solving specific problems or simplifying particular interactions.
Based on your list of ten parameters:
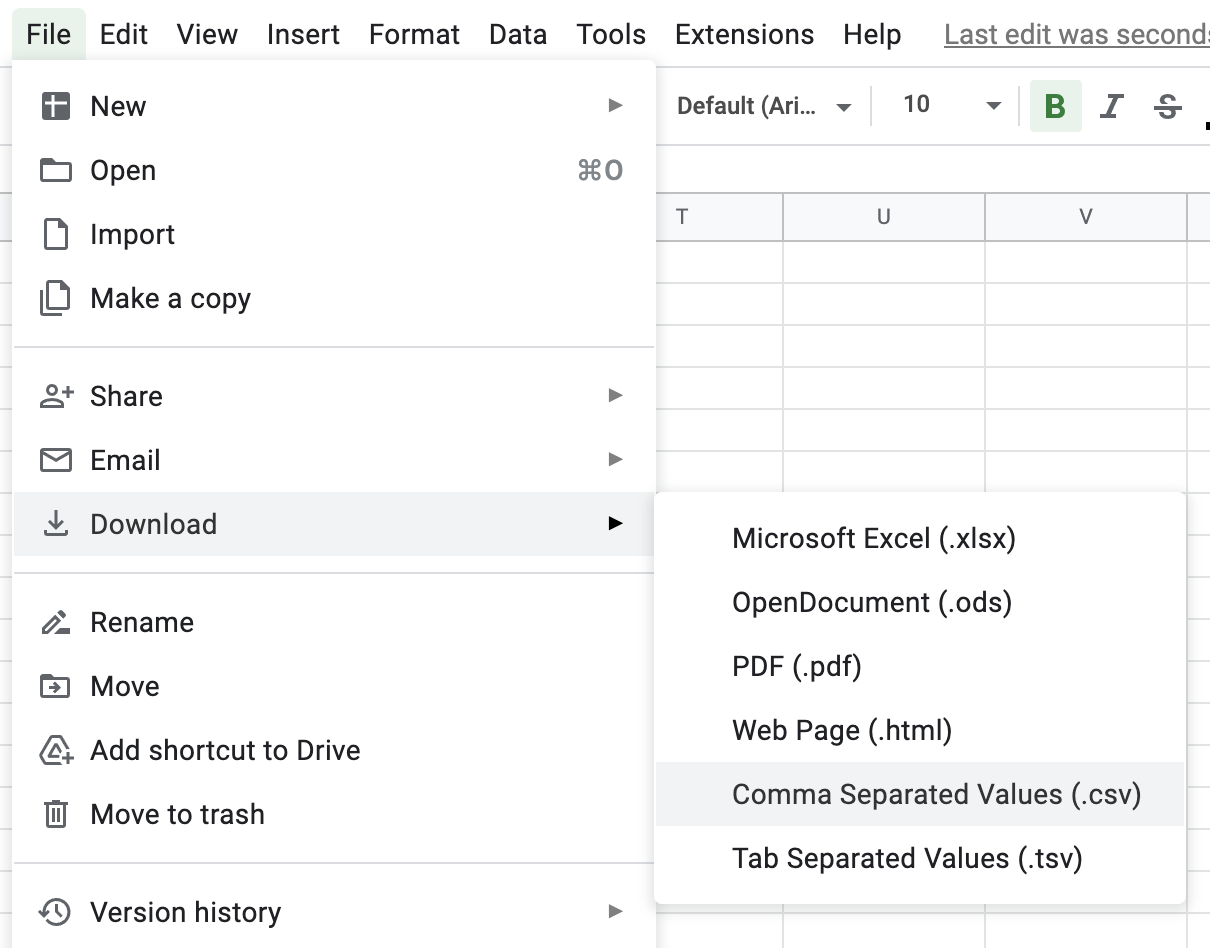
- Create a Google Sheet whose first row gives single-word (no spaces!) names to each parameter and then has 3 additional rows that each describe a single person, place, or thing within your group (i.e., specifying values for all 10 of the parameters).
- Download a CSV version of the sheet and copy/paste its text into the
.csvfile in your p5 project’sdatafolder
Based on your list of five applications:
- Design three identity systems, each targeting one of the applications
- Each application must use at least five of your parameters
- Try to use each of your parameters at least once in one of the applications
- For each identity system, create a ‘visual key’ similar to the draft you prepared this week
Design
Based on your three identity systems:
- Convert one of them to code using the p5 project we set up earlier
- Define a function called
drawIdentitythat takes a single row object from your CSV data as an argument - Call it from your
setupfunction, passing it the first (i.e., the[0]element) from the.rowsarray of your data - Once it seems to be drawing correctly for that first row’s data, test it with
[1]and[2]
Submit
Document your lists and provide a link to your p5 project:
- Due date: TUESDAY 11/9 by 11:59pm
- How to submit: Fill out this form
Document your three identity system applications by next week:
- Due date: 11/12 by 9am
- Format: one PDF with each application on its own page (or pages)
- File name: Please use your first initial and last name (for example:
cswinehart.pdf) - How to submit: Add your file to the identity-applications folder inside our shared GD355 Activities folder in Google Drive
Week 3
Select one of the use-cases you sketched last week to focus on for the remainder of the project. You will now implement its drawing logic in code and add a screen-based interface that allows users to customize the forms it generates. In this next phase, you should consider both the graphical identity that’s being generated and the overall experience of interacting with it: since the buttons, menus, and text fields are all under your control, their design is just as important as the graphic you’re generating.
Consider how you organize and group the different user interface elements and how you label them individually. Also be sure to consider how the two ‘halves’ of the screen relate to one another: the graphical output and the input controls should make a harmonious whole; don’t just dump the controls off in a corner and call it a day.
Process
Start by defining a drawSomething(data) function that uses the object passed to it as an argument to control the parameters you use for drawing. Using the CSV-based workflow from last week, test this function out with a variety of values for each of the parameters.
Next, add code to your setup() that creates the user interface using p5 functions like createInput and createCheckbox. You can use a combintion of the standard p5 draw() function and your custom drawSomething() function to read from the interface and hand off the values that have been entered in the same form that your CSV file uses. Take a look at this sample code for an example that can switch between ‘canned’ CSV data and ‘live’ UI input.
Submit
Document your lists and provide a link to your p5 project:
- Due date: 11/19 by 9am
- How to submit: Add your P5 Editor link to this form
Week 4
Take this final week to refine both aspects of your programs:
- the user interface for entering data and the way in which it shares space on the screen with the graphic
- the parametric identity design generated from the live data collected by the UI
For the user interface, be sure that each of the inputs is labeled, and that related settings are logically ordered and grouped. Beyond the interactive components themselves, design the entire screen such that the layout of the interface relative to the graphical ‘output’ feels harmonious and intentional.
On the identity side, you should now be able to see the full range of possible outcomes by interactively tweaking parameters through your UI. Test as many of these possible outcomes as you can and ensure that you’re generating visuals that are easy to distinguish from one another and are visually pleasing at all points on the spectrum of inputs. In particular, focus on the ways that certain combinations of inputs can create unexpected visual effects—some positive and some negative. Modify your design to enhance the happy accidents and mitigate the unfortunate ones.
Submit
In addition to finalizing your code, you should also create at least 3 photographic mock-ups of how your identity graphics would be used in the real world. These don’t need to be highly-polished, photorealistic composites; the goal is more to give a sense of the function of the identity graphic, the context it applies to in daily life, and the relative scales of the imagery and the physical space it occupies.
Mock Ups
- Due date: 12/2 by 9am
- Format: 3 or more JPEGs with your generated graphic inserted into a real-world scene
- File names: Create a folder with your name and place your images inside it. Name the images based on the context being depicted (e.g.,
id-bracelet-being-scanned.jpg) - How to submit: Create your folder inside the to the identity-mock-ups folder on our shared GD355 Activities folder in Google Drive
Final Code
- Due date: 12/2 by 9am
- How to submit: Fill out this form and provide a link to your P5 Editor project